Yup, did the second course of fire brick laying. Each brick manually cut on three sides by a mason hammer. Taking a long time to do.
A Honolulu Backyard BRICK Oven
Building & Baking Adventure
Current Construction Progress: Final Layer of Insulation Done. Initial Firing!

Building & Baking Adventure
Current Construction Progress: Final Layer of Insulation Done. Initial Firing!
Tuesday, August 31, 2010
Saturday, August 28, 2010
Hearth, First Course and Arch Mortared
Okay, this is what happened today.
I laid down the hearth firebricks on to the insulating 2.5 inch thick pad. The bricks are laid without mortar. Then I mortared the first course of bricks of the dome on these hearth firebricks. Also I did the arch for the oven's door area and within this arch I made a smoke chimney!

I was working full time and didn't have a chance (dirty dusty clothes, etc.) to take step by step pictures. A lot done and it all looks nice. Later on when the dome is completed, I'll cut off the firebricks that are poking out the bottom.

The arch I made in place. I used loose brick (removed partially for photo) below the arch for support. The midpoint of the arch is exactly 9 inches high. The span of the arch is 20 inches.
I think I'll give this all a week to harden up. The 2.5 inch thick insulating cement layer below all these bricks is still somewhat plastic. It's been over three days too!
Oh and this is how I used to make my arches, back in the day:

Original Olympic Arena Archway Entrance, Greece
Insulating Cement Laid
Took little over a bag to lay down the insulation pad that will be beneath the firebrick of the oven's hearth. This is the stuff I used and mixing water into it until it is like an oatmeal mush consistency:


I shaped the pour into a circle with a straight part for the door part. Taped my level to a stick to make things flat.
It took some time to get it all level. A long time. If I had forms around this top pad, the leveling would have gone much faster.
Also, something about this insulating cement is that it takes a long time to firm up enough to place your bricks on top of it. Like three days or so! The thickness of the insulating cement pad is 2 1/2 inches thick and a diameter of 40 inches. This isn't the normal "mix vermiculite with cement" mixture but a professional insulation cement that contains among other things, wool.
Firebricks at Tileco @ Campbell Industrial Park
Picked up 90 Firebricks @ $3.25 each. These bricks are not of the high quality that I got on the cheap from Reuse Hawaii, which are also the high quality firebricks at Pacific Refractories @ $5.75 each.
The Tileco firebricks are not square and bulge out on its sides. For constructing the oven's dome, this isn't a big issue as mortar is forgiving.
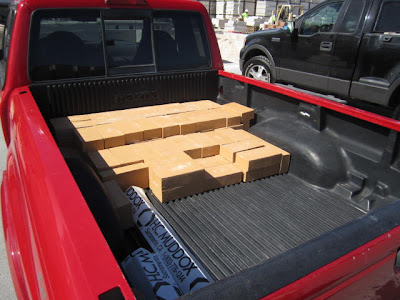
Tileco out in Campbell Industrial Park is a huge huge place! They make their own pavers and hollow tile but these firebricks they get from the mainland, from H.C. Muddox.
From Tileco Inc:
Firebricks 4.5inch x 9inch x 2.5inch, 90 @$3.25
Total with Hawaii excise tax: $303.45
Friday, August 27, 2010
Slab Poured
Placed a brace on top a sawhorse to support the middle of the Wonderboard. Then poured concrete over the rebars.
Sloped the sides up nicely ---no wood forms used or needed (saved some money):

Spent more money on cement and sand.
City Mill:
Sand, 7 each @$6.99
Cement 94# @$16.27
Wooden Dowel 1 5/16 x 8 feet (for leveling insulation cement) @ $11.49
Total: $80.31
Sloped the sides up nicely ---no wood forms used or needed (saved some money):

Spent more money on cement and sand.
City Mill:
Sand, 7 each @$6.99
Cement 94# @$16.27
Wooden Dowel 1 5/16 x 8 feet (for leveling insulation cement) @ $11.49
Total: $80.31
Wednesday, August 25, 2010
Slab Concrete Foundation

What's a sumo picture have to do with a woodfired oven?
Well, note how the sumo ring is built. It has sloped sides starting off in a perfect square. Then the sumo ring in show in white (salt). Well, this is how I am now thinking of constructing my supporting slab. It will be make of concrete (cement and gravel mix with rebar) but instead of using vertical wood forms, I will just manually angle it upwards just like a sumo ring.
And the circle would be my oven placement on the slab. This way I will save on having to get plywood and constructing form work. I'll also save some on the concrete needed.

Here you can see the 1/2 inch rebar I used. I've grouted the perimeter of the wonderboard below and supported midway the front with my pickax. By tomorrow the grouting should be strong enough to support my 3 inch deep concrete pour...
Also if you look carefully, you can see the beginnings of that sumo ring's sloping.
The Price of Firebrick in Honolulu
Called up Tileco Inc located in Campbell Industrial Park (808) 682-5737 about their firebricks. Price per brick is $3.22 !! which compared to Pacific Refractories $5.75 makes it a bargain here in Hawaii.
I'll be getting firebricks from Tileco when I start working on my oven's dome.
On, the clay bricks from Tileco (Montery line) is $2.45 each and I may use those for the deck entrance to the oven...
I'll be getting firebricks from Tileco when I start working on my oven's dome.
On, the clay bricks from Tileco (Montery line) is $2.45 each and I may use those for the deck entrance to the oven...
Possible Additional Honolulu Fire Brick Source
With Pacific Refractories asking $5.75 per firebrick, I have been searching online for some other Hawaii source.
Found tilecoInc with firebricks and clay bricks.
I'll call them up this morning to find out the scoops.

I could use the cheaper clay bricks for the loading area and the oven door's arch and stuffs.
Found tilecoInc with firebricks and clay bricks.
I'll call them up this morning to find out the scoops.

I could use the cheaper clay bricks for the loading area and the oven door's arch and stuffs.
Foundation Walls Done

Walls all done and completed grouting four corners and three mid points. Casting the deck slab is next...
Had to buy more fine gravel for the grouting.
From City Mill:
Rebar 3/8 inchx10feet, 2 each @$5.59
Rebar 1/2 inchx10feet, 4 each @$7.29
Basalt Sand, 7 each @$6.99
Basalt Rock @$6.69
Cement 94# @$16.27 (I quit using QuikCrete, too expensive)
Total with Hawaii excise tax: $117.51
Tuesday, August 24, 2010
Re-use Hawaii
Okay, feeling bummed out at the $5.75 per firebrick asked by Pacific Refractories, I went to this place called Re-use Hawaii which is in Kakaako, next to UH School of Medicine. I saw a craigslist ad they placed about CLAY PAVER BRICKS which I thought might do the trick...
...and well, I went there and all these clay bricks were spalling! Flaking right and left! Chips were falling off in my hands! Not good at all. So feeling even more bummed, I walked around and around looking...
...and spied this baby:

Note: In the background are the craigslist clay paver bricks and even from here you can see the spalling occurring.
WOW!!!! Firebricks, and UNUSED, IN LIKE NEW CONDITION!!! I picked up 24 of these cute babies @ 50 cents a piece!!! Compare that to $5.75 that Pacific Refractories wanted. Whoa!
I asked Re-use Hawaii about these bricks and seems like someone donated them, so sad to say this is a one time shot. The Re-use Hawaii guys didn't know what these bricks were or how valuable they were. It was also like God or something guiding me here to this.
From ReUse Hawaii:
Firebricks in DISGUISE AS REGULAR BRICKS, 24 each @$0.50
Total with tax: $12.57 (astounding....)
Pacific Refractories LLC
As mentioned in the first post, getting any sort of fire-rated material is a challenge. Luckily I found this place here in Honolulu (Kalihi):

Bill (older fella, like around 70) is the warehouse/delivery person. Nice guy. Gloria is the office sales person (at another location). Look, I found FIREBRICKS inside:
 Alas, at $5.75 per, I won't be biting. I did however pickup Insulating Cement and also high temperature grouting cement:
I also looked at the Mizzou CASTING Cement which is used for creating your very own firebrick grade material that you form into however you want. I'll keep this product in mind as I may use some to finish my oven's dome.
From Pacific Refractories:
Insulating Cement, 2 each @$53.77
Sairset High Temp Mortar 55# Pail @$51.1
Total with Hawaii tax: $161.10 so adding to the running total, see above.

Bill (older fella, like around 70) is the warehouse/delivery person. Nice guy. Gloria is the office sales person (at another location). Look, I found FIREBRICKS inside:

I also looked at the Mizzou CASTING Cement which is used for creating your very own firebrick grade material that you form into however you want. I'll keep this product in mind as I may use some to finish my oven's dome.
From Pacific Refractories:
Insulating Cement, 2 each @$53.77
Sairset High Temp Mortar 55# Pail @$51.1
Total with Hawaii tax: $161.10 so adding to the running total, see above.
First Foundation Course Done!
Clearing out area in the garden for the oven:

Note the low stone wall in the background. I will be using it's footing for the back of my foundation support for the oven.

Trying out the final design on a sidewalk adjacent to the actual place the oven will be (above pic.)
The foundation will be 41 1/2 inches wide by 48 inches long. This longer part will be for the loading area of the oven...
After much fooling around with string and a line level, finally I got the first course of hollow tile all laid out nicely nice:

Tomorrow I'll lay in some re-bar and also fully grout the hollow tile. Oh, for a footing I just put in around 6 inches of gravel and then laid the hollow tile on top of it. I want to save some cement/money by not having a concrete footing. Instead, I'll fully re-bar the first course and also the top course and do a full row of grout, top and bottom. I'll also grout/re-bar the four corners and two in the middle on the longer sides.
I also will just dry stack the hollow tile in between the bottom and the top course of hollow tiles.
Saturday, August 21, 2010
Initial Plans & Purchases

Drew out my plans. I FOUND A SOURCE OF FIRE BRICKS here on Oahu thru Craigslist. Just a $1 per 6"x12" red clay bricks about 4 inches thick!!! Very cool...
So the middle drawing is the layout of my hearth oven floor. It will be 30 inches deep i.e. 2 and 1/2 bricks and about 32 inches wide i.e. 4 each of those bricks laid lengthwise.
The bottom drawing (also looking downwards) is the layout of the hollow tile (6"x8"x16" size). There will be five courses (rows) of hollow tiles which comes out to 40 inches tall wall. I plan to cut some cement board (wonderboard) to span the U shaped hollow time to surface and then place some cut up rebar laying down on the wonderboard and then pouring cement all over it creating a strong reinforced concrete table top.
Initial Purchase from City Mill:
Hollow Tile 6x8x16 Knockout, 16 each @$1.57
Hollow Tile 6x8x16, 22 each @$1.67
Hollow Tile 6x8x8, 4 each @$1.17
Wonderboard 1/2 inch $12.67
Motar Mix Quikcrete 60lbs. $8.87
Rock Gravel 3/4inch 1/2 cubic feet, 3 each @$6.69
Rebar 3/8 inch roundcut 10 feet, 2 each @$5.59
Total with Hawaii excise tax $124.96
Building a Stone Oven in Hawaii
There are a whole bunch of websites about building earth ovens (cob oven) or "real" stone ovens...
...but none about building a backyard stone oven in HAWAII.
Living in a tropical climate such as Oahu there isn't much demand for fireplaces and such (but I've seen Big Island websites showing commercial fireplaces, saunas and barbecues though.) It's hard to get any sort of refractory materials locally here.
Today August 21, 2010 starts my stone oven building adventure.
GOAL: To have a working wood fired stone oven operational i.e. cooking my sourdough breads and neapolitan type pizza.
Subscribe to:
Posts (Atom)